Notifications, navigation, and settings
On the Office 365 for business nav bar, you’ll find a set of links that take you to different parts of your Office 365 work or school account. This article focuses on the features that are supported by Outlook Web App: notifications, links to each type of information stored in your mailbox, and links to your personal information and options.

-
The mail icon  appears when you have a new message, and the calendar icon
  shows up when there is a calendar or task reminder. You can click the mail icon for a preview of the latest new message, or the calendar to view and manage calendar and task reminders. The icons appear only when there is a new message or an active reminder.
-
Click on the nav bar  to switch to other areas of Outlook Web App.
-
Chat status, personal information, options, and help are provided. Use this area  on the nav bar to sign in to chat and to manage your chat status, change your personal information, go to options, get help, or sign out of your account.
Top of Page
Open an item in a separate window
By default, you read and create items in Outlook Web App either in the reading pane or in a window that overlays the main window. But that isn’t always what you need. Sometimes you need to be able to view or edit an item in a separate window.
For most items, click the Pop-out window  in the upper-right corner of the item you’re working on to open that item in a separate window.
To open a message that you’re reading in a separate window, click More  , and then choose Open in a separate window.
Top of Page
Work offline
Offline access lets you use Outlook Web App on your laptop or desktop computer when you’re not connected to the Internet. For information about setting up offline access, see Using Outlook Web App offline.
Top of Page
Mail
After you sign in to Office 365, click Outlook to go to your Inbox in Outlook Web App. For more information about messages in Outlook Web App, go to Mail Overview.

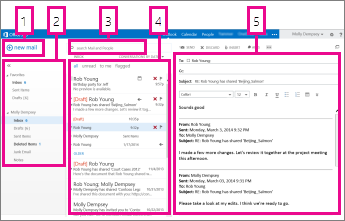
Mail is where you’ll find your messages.
-
New mail. Create a new message by clicking  .
.
-
Folders. The Folders list includes the folders in your mailbox and Favorites. It may include other folders, such as Archive folders.
Click Expand  to show the Folders list, or click Collapse
  to hide it. To view the contents of any folder in the list, click Show
  to expand a list, or click Hide
  to collapse a list.
-
Search box. In the search box, type what you want to search for, such as the name of a person you want to find messages from, or text that you want to search for to find a particular message.
-
List of messages in the current folder. Each entry in the list view has additional information, such as how many messages there are in a conversation and how many are unread, or if there is an attachment, flag, or category associated with any messages in the conversation. A conversation can have one or more messages. When a conversation is selected, you can delete it, add a flag, or add a category by clicking the associated icons. At the top of the list view are filters that you can click to quickly find messages that are unread, that include your name in the To or the Cc box, or that are flagged. In addition to the filters, you’ll see the name of the folder you’re viewing and the view that you selected.
-
Reading pane. The message you selected is displayed. You can respond to any message in the conversation by clicking the links at the top of the message.
Top of Page
Calendar
After your Inbox, the calendar is probably where you’ll spend the most time when using Outlook Web App. For more information about calendars in Outlook Web App, go to Calendar Overview.

-
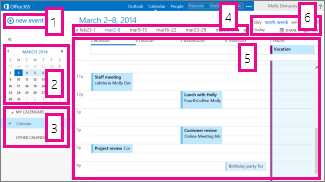
New event. Create a new event by clicking  . An event can be an appointment, a meeting, or an all-day activity.
-
My Calendars. Use the calendars to go from one date to another. Shading shows you what week you’re currently viewing. Darker shading marks the current date. You can use the calendar icon at the top to collapse or expand this side of the calendar view.
-
Other Calendars. You can view more than one calendar at a time. Other calendars let you add other people’s calendars and select which to display.
-
Day nav bar. This is another area that you can use to go from one day to another. Click any date to jump to that date. Or click an arrow at either end to see the dates before or after what’s displayed.
-
Main pane. Selected calendar is displayed.
-
Views. Select the view you want, and share or print your calendar.
Month view
The month view can be very crowded. To make it more usable, there’s now an agenda displayed for the selected day.

-
Darker shading shows the current date.
-
Lighter shading shows the selected month.
-
Shading shows the selected day and the number tells how many non-displayed items there are for each day. Double-click an item to open it. You can create a new event on any date by double-clicking in the box for that date.
-
Shaded item is an all-day event.
-
The agenda for the selected day. You can create a new item on the current date by double-clicking in a box in the agenda.
Top of Page
People
People is where your contacts are stored. From here, you can find, create, and edit your contacts. Also, you can search for contacts in your organization’s directory. For more information about contacts in Outlook Web App, go toPeople Overview.

-
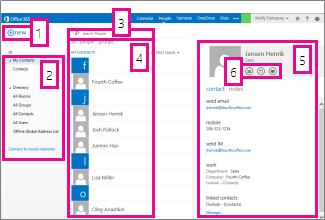
Create a new contact by clicking  .
.
-
All the places you can find contact information.
-
Search. Type a person’s name here to search for them in your contacts and in your organization’s directory.
-
List of all contacts in the current folder.
-
The contact card for the selected person.
-
Actions you can take directly from the contact card. Click the icons to send a message, start a chat session, or create a meeting request.
Tasks
Tasks store tasks that you create or that are sent to you, and messages that you flagged. To view your tasks, clickTasks below the Folders list. When you view your tasks, the default view is Flagged Items and Tasks. You can change that view by selecting Tasks in the Folders list. For more information about tasks in Outlook Web App, go toTasks Overview.

-
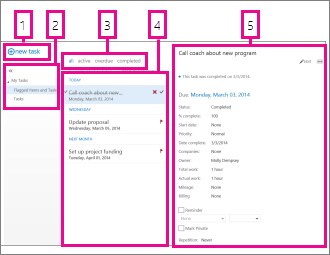
Create a new task by clicking  .
.
-
Use the My Tasks pane to view flagged items and tasks, or just tasks.
-
Filters. Select the filter depending on what items you want to see. Tasks and flagged items that don’t have a date associated with them and that aren’t completed appear only when you select All.
-
List of items that meet the current filter criteria. Click any item to view it in the reading pane. You can use the controls in the list view to make changes to an item’s status. For example, you can mark a task as complete, or remove a flag from a message.
-
The reading pane, where the content of the items you’ve selected is displayed. You can use the controls in the upper-right corner to make changes to the item if it’s a task. If it’s a message, the controls are the same as those available when you read your mail.
Top of Page